Tag Archives: homemaking

Homemade Granola

trader joes, homemade granola, blueberry almondI hosted book club on Saturday morning. I knew, since we were going to get home late from the Blackhawks game Friday night, that I wouldn’t feel like getting up to bake muffins or something in the morning. So, I tried to think of something tasty that I could make a day in advance, that would still taste fresh and “homey” the next morning. Then the idea of a yogurt bar popped in my head and I decided that would be easy enough, even if I made homemade granola instead of serving store-bought.

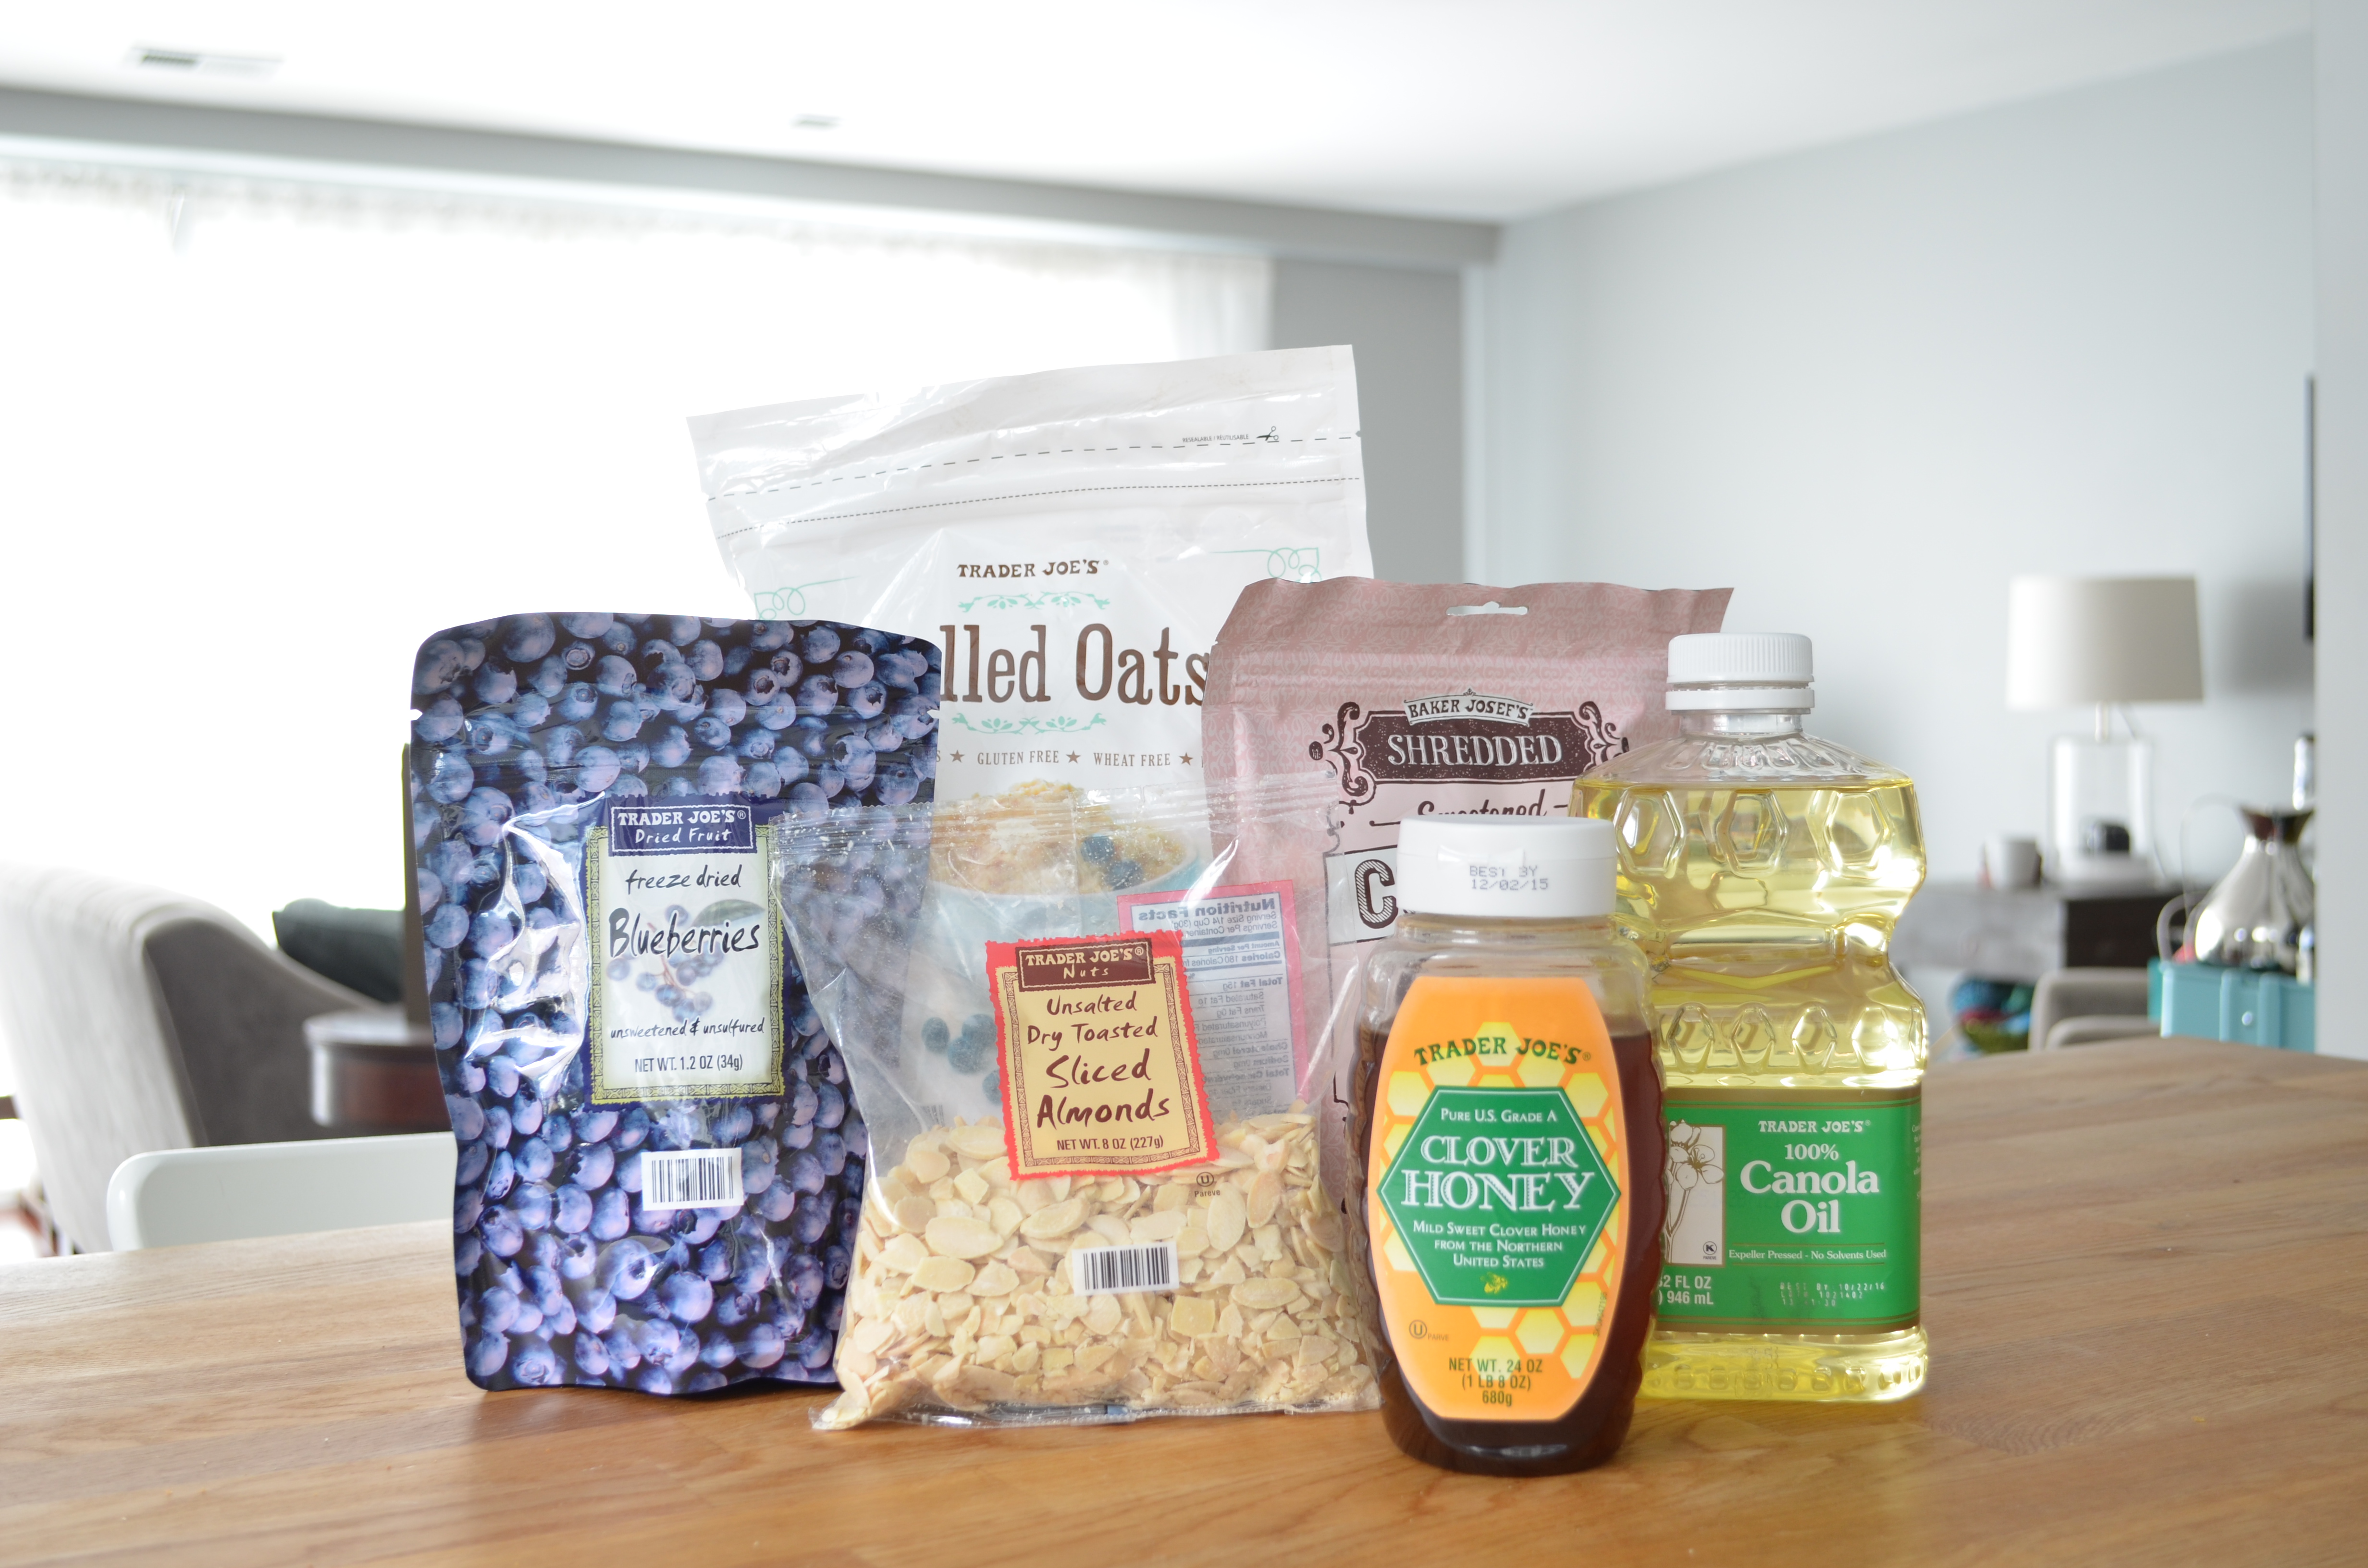
This Martha Stewart recipe for Blueberry Almond Granola looked like a winner and -best part ever- I could buy all of the ingredients at Trader Joe’s!! (That’s always a bonus for me…I like my tiny Trader Joe’s and hate having to go to a second grocery store for one ingredient.)

On Friday afternoon, I whipped up a batch of granola and even though I followed the directions to the letter, the granola was over-toasted. It wasn’t really burnt. (I still liked it, but I also like my toast one step below blackened.) But the coconut was really toasty and it kind of affected the taste of everything else. I didn’t feel like I could serve it to guests. So, I gave it another go and so I’m sharing the recipe and method that worked best for me in hopes that no one else will burn their coconuts.

Blueberry Almond Granola

2 cups rolled old fashioned oats

1/2 cup sliced almonds

2 tablespoons vegetable oil

2 tablespoons honey

1/2 cup shredded coconut (sweetened or unsweetened)

1 cup dried blueberries

Pre-heat oven to 350°

Place the oats and the almonds in a large bowl. Mix oil and honey in a small bowl and drizzle over the oats and almonds. Stir to coat evenly. Spread the oats and almonds on a large baking sheet and place in the oven for 15-20 minutes, stirring every 5 minutes or so. (Mine was done at 15. Keep an eye on it.)

Place shredded coconut on baking sheet and put in oven to toast separately. I left my oven door open and stirred every minute or so for about 4 minutes. You can also toast the coconut on the stove using the method explained here.homemade granola, trader joes 
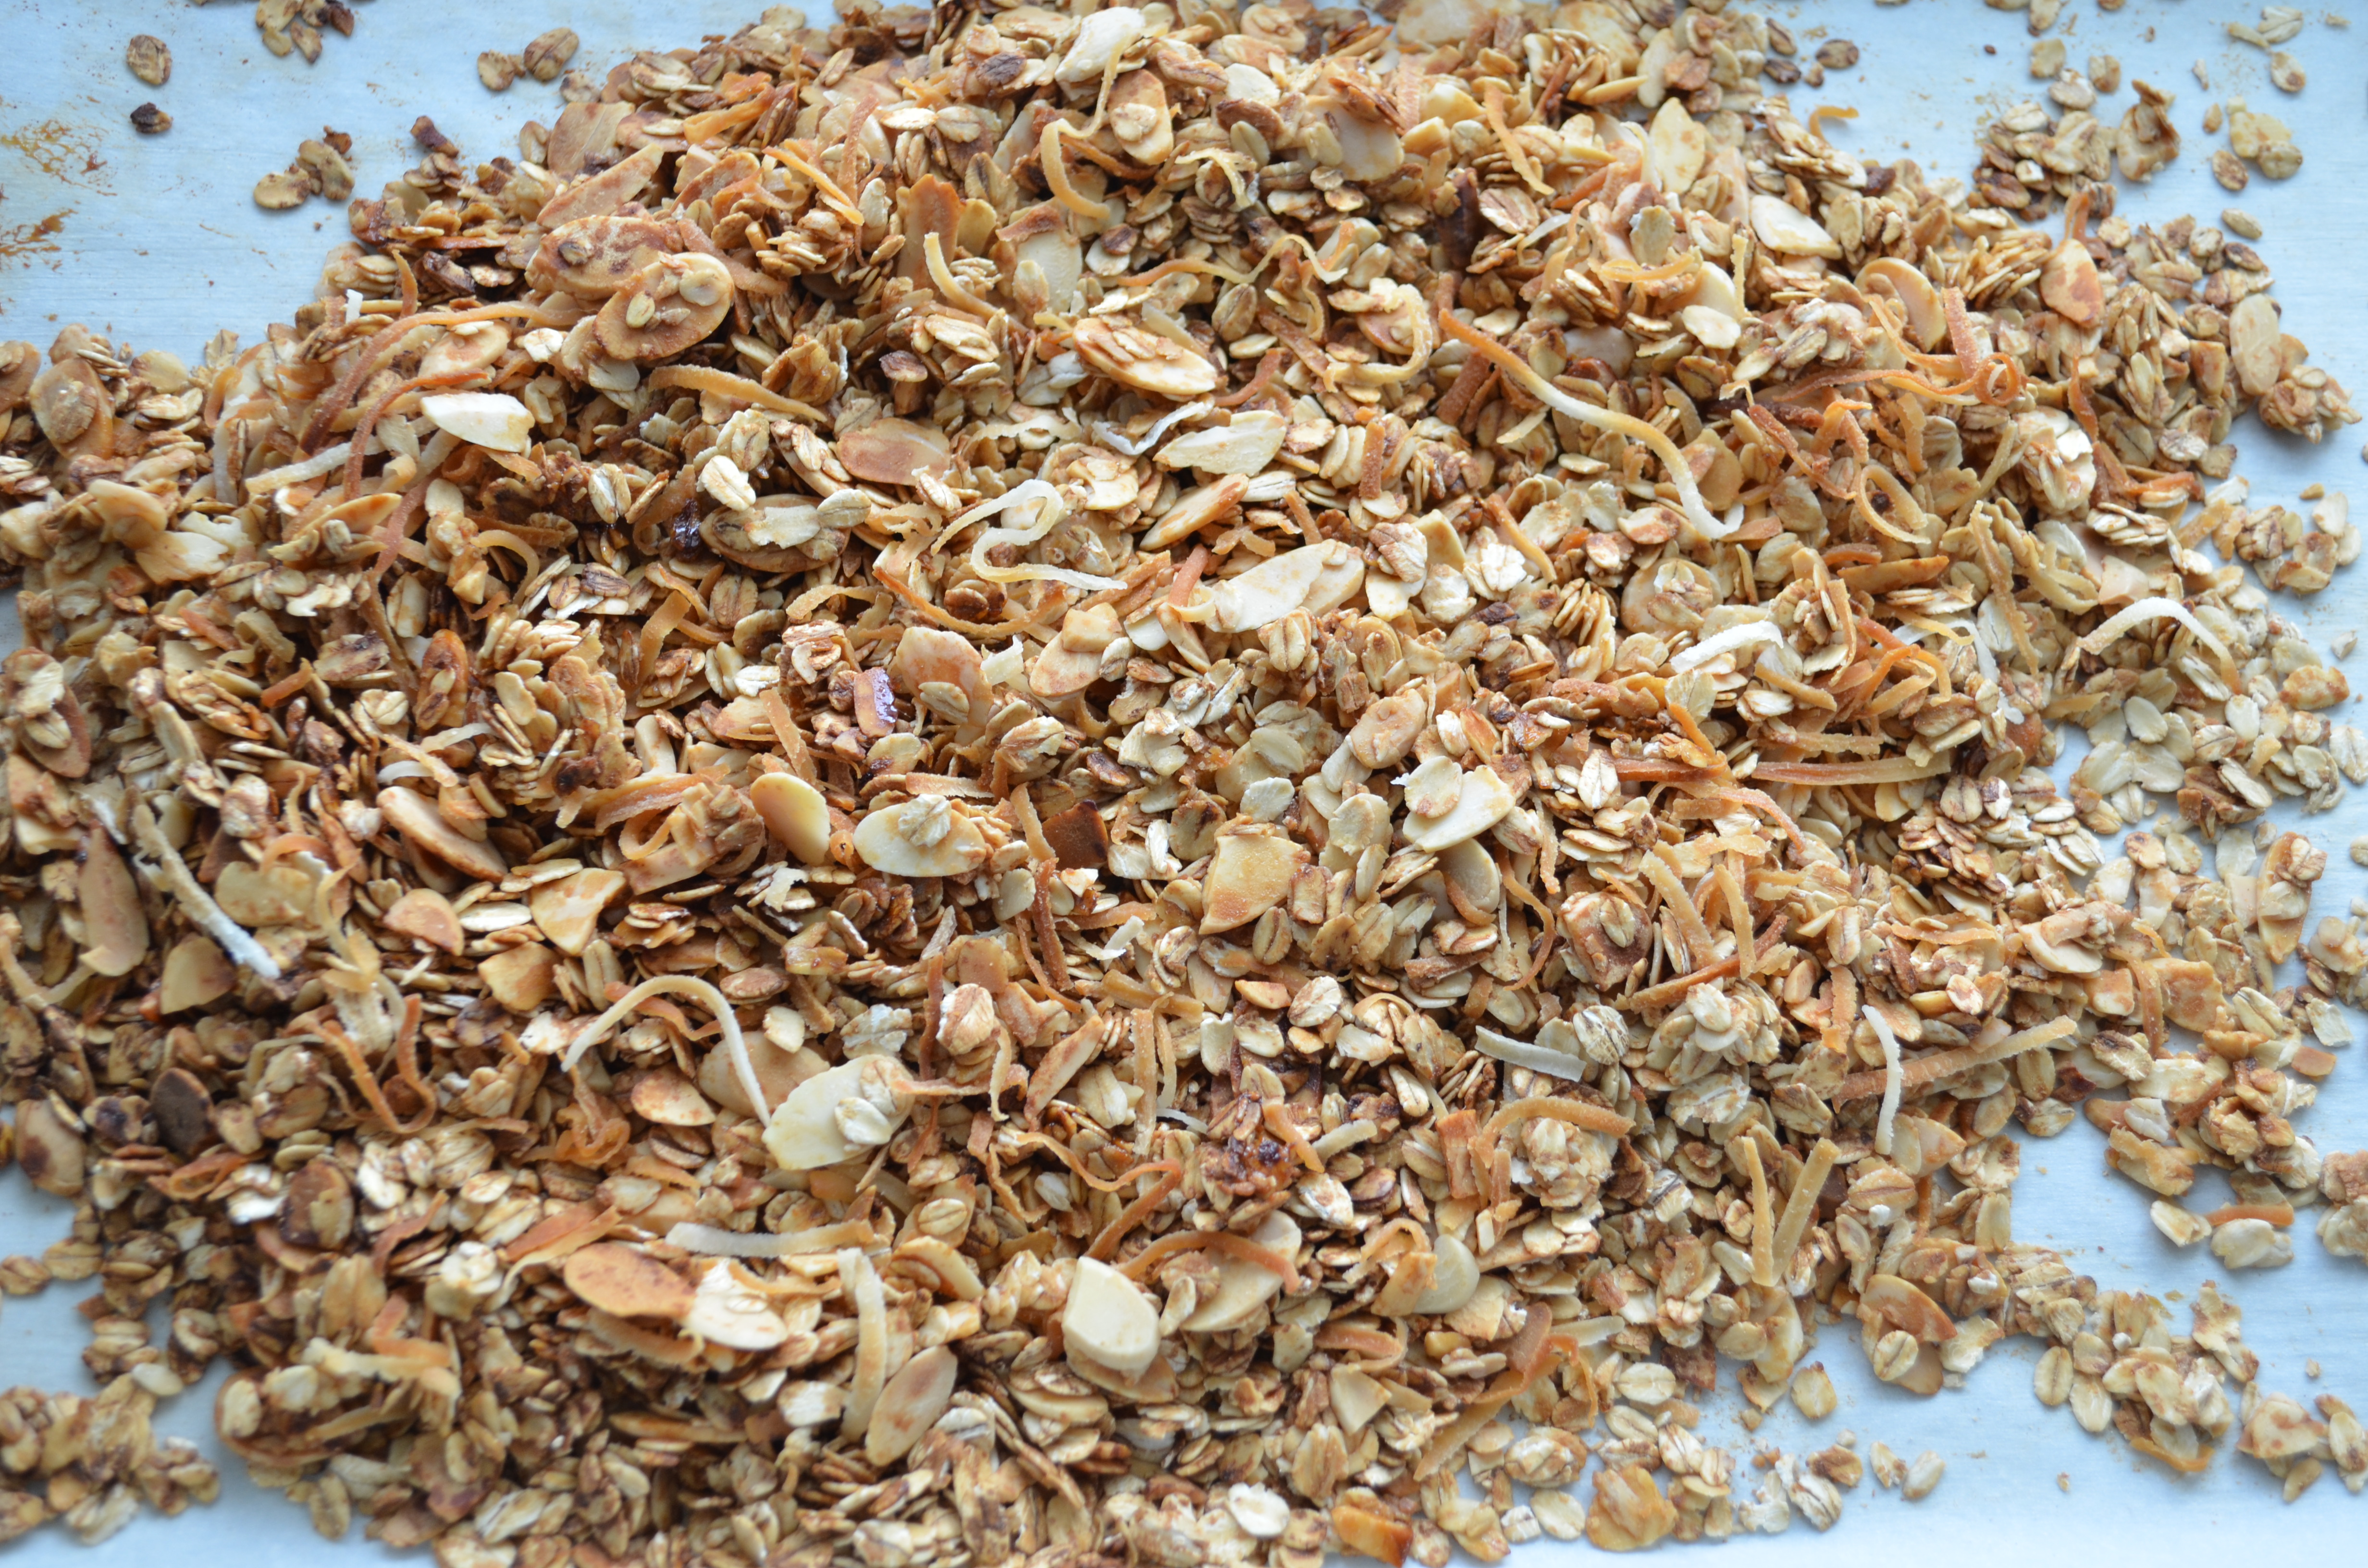
Once the coconut is toasted, add it to the oats and almonds and allow to cool. trader joes, homemade granola
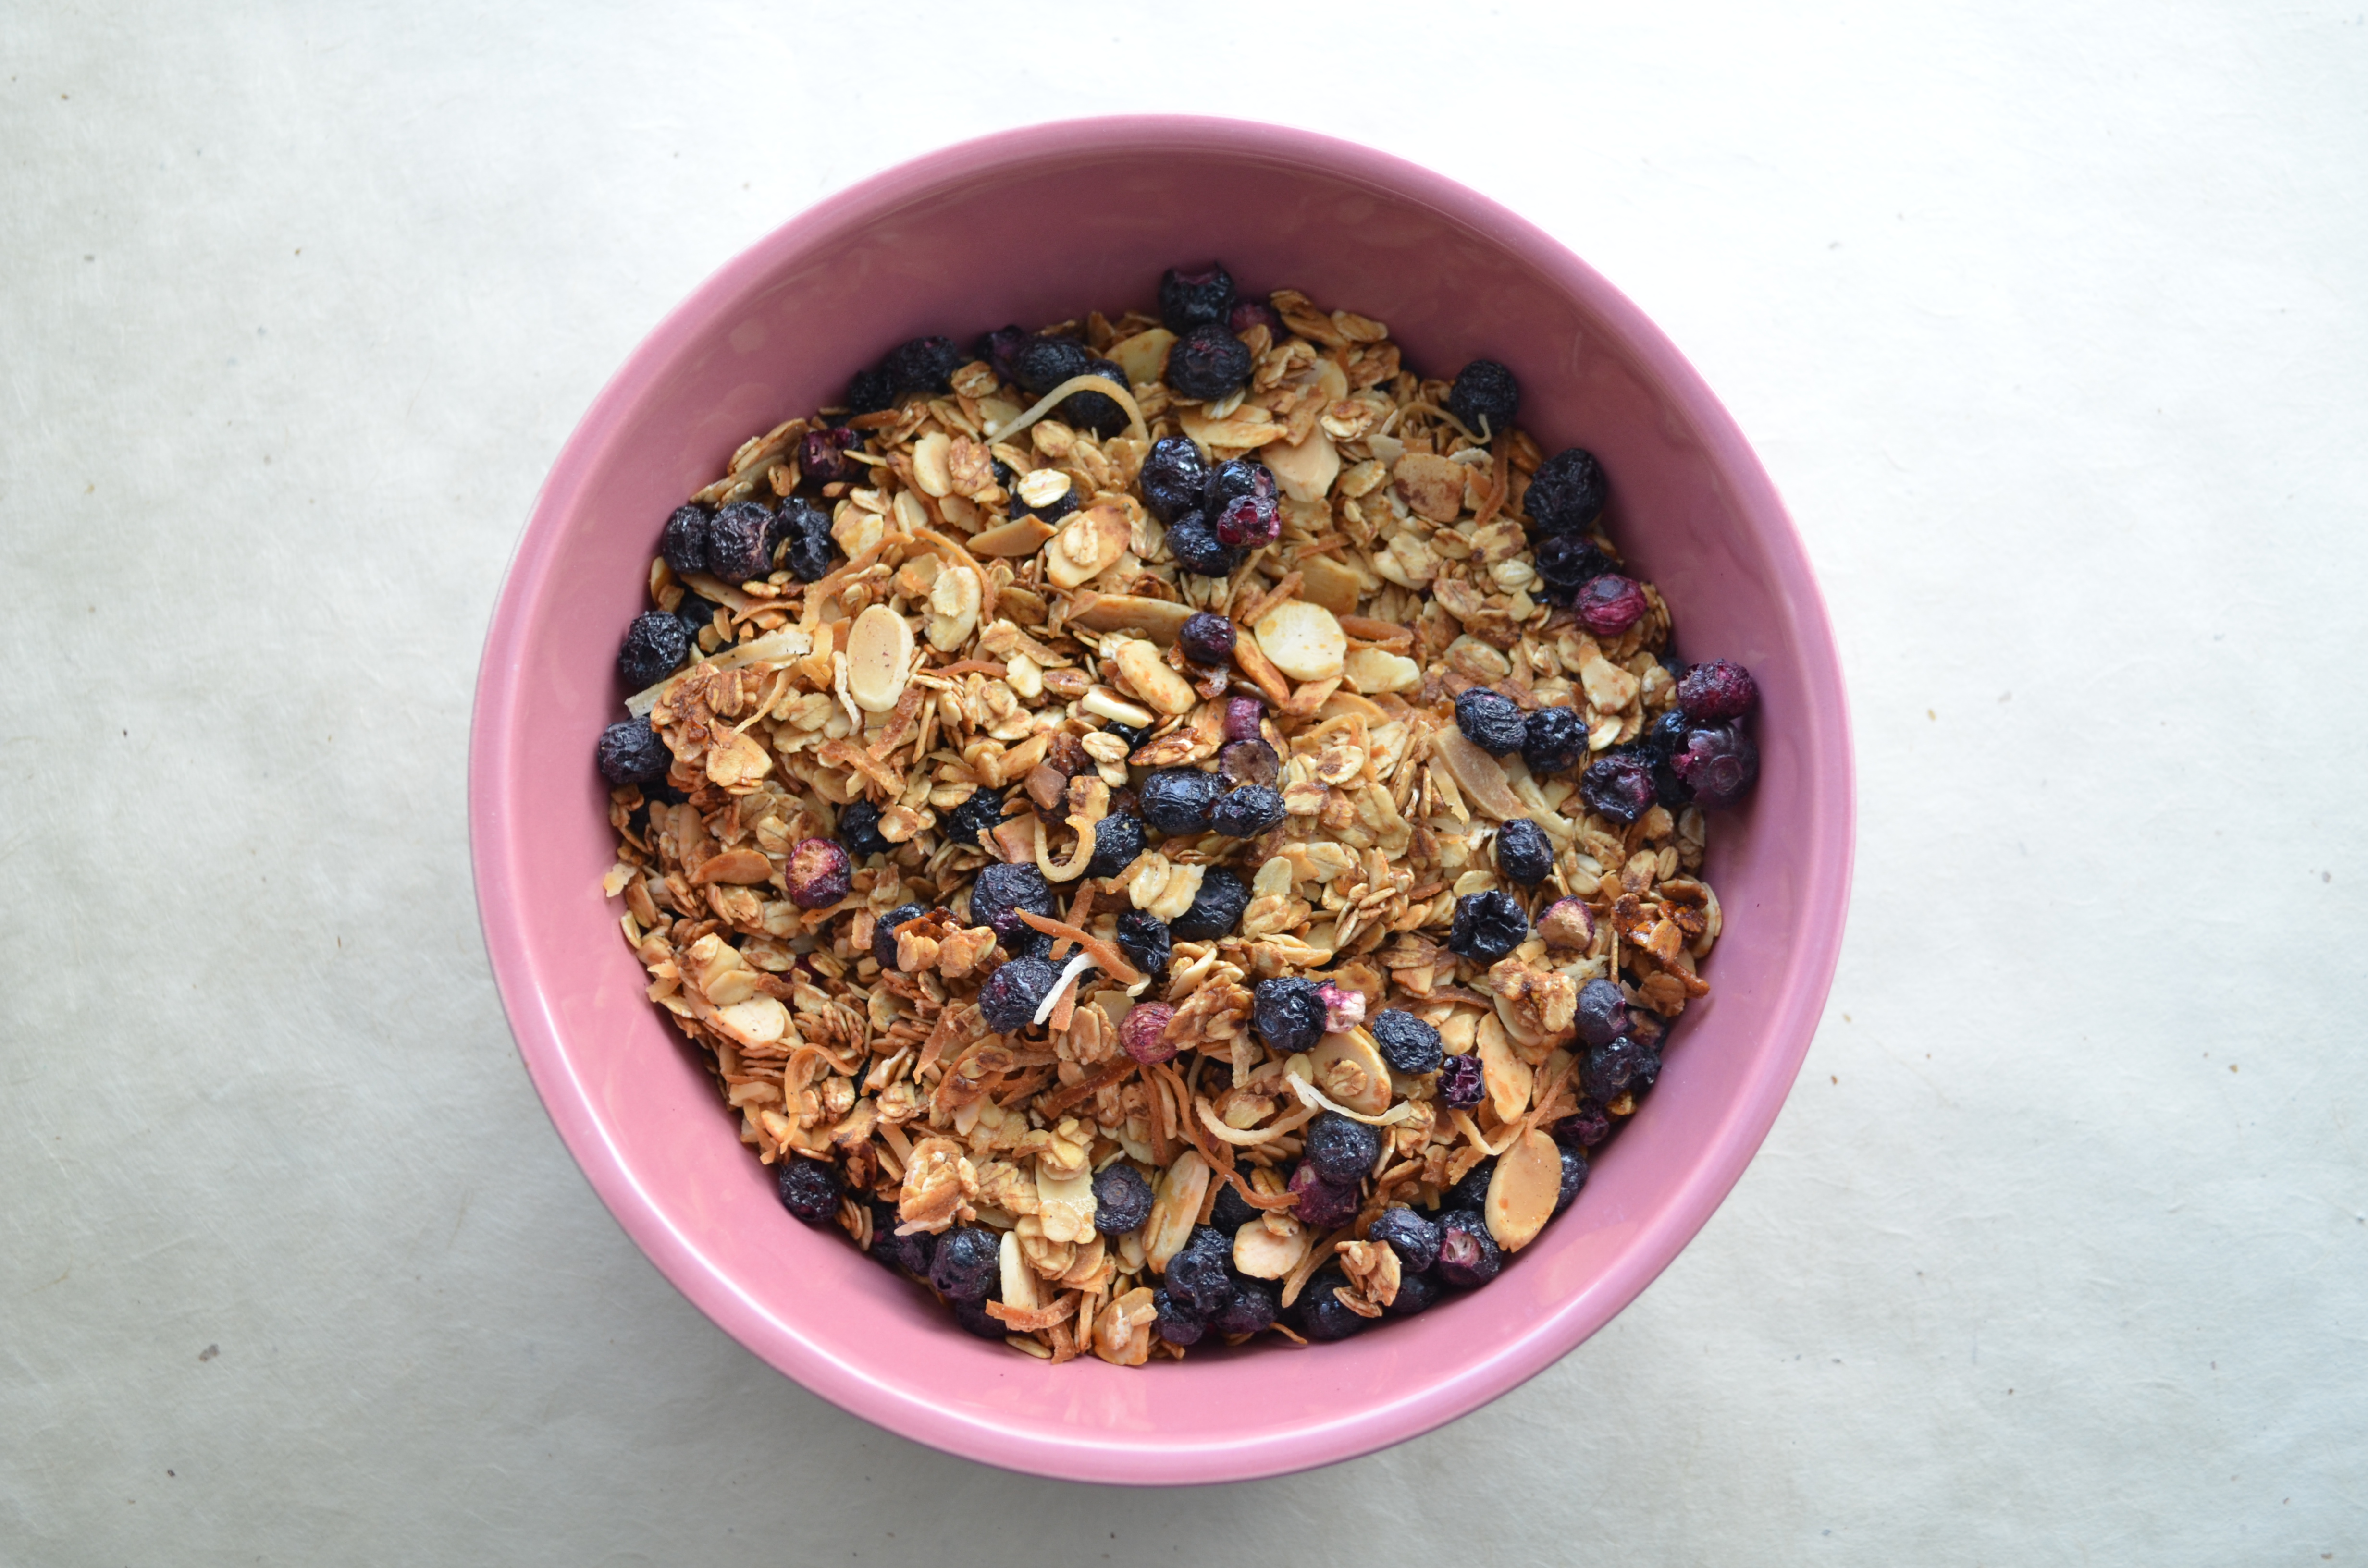
Stir in the dried blueberries and it’s ready to eat! I served mine with vanilla yogurt and fresh raspberries and blackberries. I think the book club enjoyed it, too…either that or they’re a bunch of good actors!

The granola is a lot less sticky sweet than store-bought granola but you don’t really miss the sugar because the toasty, oaty deliciousness is enough. And I have to say, even my coconut-hating husband liked it!

Tagged , , , ,

Homemaker’s Challenge #5: Sushi

making sushi at homeNaoto and I made homemade sushi in December. (Naoto did all of the work, but someone had to be in charge of taking photos, right?) It’s something that’s been on our to-do list for awhile, and Naoto saw a holiday sale for sashimi-grade tuna so he brought some home on a whim. He also bought a sushi maki, the bamboo contraption that helps roll the sushi rolls. making sushi at home, seasoning riceWe made regular rice using our rice cooker and, once the rice was cooked, we seasoned it with sushi rice seasoning (sushinoko). All of the instructions were in Japanese but I think we used two tablespoons for two cups of rice. It gave the rice a little bit of a vinegar flavor, which apparently helps to highlight the fish. making sushi at home, slicing tunaWhen the rice was cool, Naoto worked on the tuna. To make sushi, you have to use sashimi-grade fish. You can’t just go to the grocery store and choose any piece of fish, leave it raw and call it sushi. (This article muddies the waters…it’s unclear what determines if fish is “sashimi-grade”. I think the bottom line is…only shop at trusted places and this is not the time to be shopping for day-old specials.) Naoto got our piece of tuna from Mitsuwa, where sashimi-grade tuna is about $32/pound (regular price). Thankfully, the small piece of fish (a little larger than a deck of cards) was the perfect size for our sushi appetizer.

Naoto sliced the tuna into 1/2 inch pieces. making sushi at homeHe cut the nori (seaweed sheets) into pieces just long enough to fit the tuna. Then he spread the rice, leaving two and a half inches at the top empty for rolling. (He also covered the sushi maki with plastic wrap. Apparently this is a restaurant tip to keep the sushi maki clean.) Keeping a bowl of warm water on hand to wash off the sticky rice was helpful, too. making sushi at home, adding wasabi and tunaAfter dabbing on a bit of wasabi, he laid down the fish about one inch up on the rice end of the nori. making sushi at home, rolling sushiNext, he rolled up the sushi tightly. making sushi at homeI don’t think it was a bad first attempt, but it was hard to get the right amount of rice. Next time, we need to work on using less rice or cut thicker pieces of tuna to make up for the rice. It’s definitely harder than it looks to get the perfect amount of rice and a nice, tight roll going on. Sushi chefs make it look too easy! making sushi at home, presley tries tunaEven Presley got into the sushi action with a taste of fresh tuna. She loved it, obviously.

All-in-all it was a lot of fun and a tasty experiment. I think we are going to devote a Hasegawa Happy Hour to sushi making soon, where we will add some more ingredients like avocado and cucumber and maybe another type of fish.

To see the other Homemaker’s Challenge posts, go here.

Tagged , ,

Our Thanksgiving 2014

thanksgiving table 2014, centerpieceAnother Thanksgiving is in the books and the world (and our apartment) is moving on to Christmas. As usual, Naoto whipped up a delicious meal and my mom made a yummy spiced apple cheesecake for dessert. thanksgiving table 2014, table setting, yellow owl workshop placecard stampI wasn’t feeling especially inspired, so I set a simple table this year. I crafted a “centerpiece” from a turkey on a stack of books and some candles, similar to last year’s table. I used some thrifted paper turkey napkin rings and I made place cards with my Yellow Owl Workshop place card stamp. yellow owl workshop place card activity kit, thanksgiving placards, embossedI embossed the stamp in copper and typed our names. Simple…and with a table of four, it is really important that everyone can find a spot at the table! thanksgiving 2014, my mealIt was a delicious, relaxing day…I feel like Thanksgiving is the end of the calm part of the year, maybe that’s why it’s my favorite.

How was your holiday weekend?

Tagged , , , , , , , , , ,

Scenes for Halloween

decorated bar cartHappy Halloween! Here are a few scenes from around the apartment this year.Halloween decs living room Halloween decs dining room Halloween decs dining room Halloween decs living roomHalloween decs bathroomWe aren’t hosting a party, but we have had friends over throughout the month. But even without visitors, I’m glad I decorated. There’s something fun about having a festive home, especially as the days get shorter and darker and you find yourself inside watching spooky movies and reading scary stories.

Tagged , , , , , ,

Urbs In Horto

Urbs in Horto, Starshaped Press, Letterpress PrintI bought this amazing “Urbs in Horto” print from Starshaped Press last year at Show of Hands. This weekend, I finally framed it and hung it…one of those things that should have happened last November but didn’t. I originally bought the print for our front hallway. We have kind of a travel/map/Chicago theme going on in there. But I thought the print was too amazing to be stuck in a corner that we barely see coming in and out of our apartment. So I hung it up in the living room where we can see it all the time.

Urbs in horto, Latin for “city in a garden,” was Chicago’s slogan in the 1830s, celebrating Chicago’s commitment to parks in the city. (This article from the Chicago Park District can tell you more.) Starshaped Press created the print to celebrate Chicago’s 175th anniversary in 2012. The print is made with only antique metal type and letterpress printed in seven colors…it’s truly a work of art. I’m only sorry I waited so long to hang it up!

The weather is gorgeous in Chicago all week long, so if it gets a little quiet around here, just know I’m out soaking up the last bits of summer…now that fall is almost officially here!

P.S. To see some impressive detail shots of the print and the incredible set-up of all that type, go here!


Tagged , , ,

Summer Fresh Salsa

summer fresh salsa ingredientsI’ve been on the obvious end-of-summer mission to use up our tomato crop. In the last week, I’ve eaten tomato sandwiches, BLTs, roasted tomato caprese salad, panzanella, plain ol’ caprese salad, and I’ve added tomatoes to every other meal I’ve made or eaten. And still…there are tomatoes.

Since we have so many Juliets (which are slightly larger than grape tomatoes and are not well-suited for sandwiches because of their tiny size) I decided to make salsa last weekend. I started with this recipe and made some tweaks to give it the freshest flavor possible.

Summer Fresh Salsa

24-30 Juliet tomatoes (or 6-7 Romas), chopped

2-3 Jalapeño, seeded and diced

1 red, yellow or orange  pepper, diced

1/2 red onion, diced

4 cloves garlic, minced

handful cilantro, chopped

1-2 limes, juiced

1 Tablespoon olive oil

Sea salt, to tastesummer fresh salsaChop and stir the vegetables and herbs together. Add olive oil, salt and one lime. Taste and add more lime or salt as needed. (I usually use two limes because I like things citrusy.)

This salsa is very fresh, but if you prefer something more spicy, you can add chili peppers, chili powder some of the jalapeño seeds to heat things up. Try to make it ahead of time and chill it in the fridge to allow the flavors to meld. summer fresh salsaIsn’t it a pretty salsa? I love the colors and the crunch and the garlic and the citrus…and of course the tomatoes. Those perfect garden Juliet gems really make a good salsa. I’m so thankful for our bountiful harvest!

Tagged , , , ,

Flowers, Flooding & Failures

cypress vine flowerI had another post planned for today, but it’s as dark as a cave here and I couldn’t get a proper picture. It rained several inches around here last night. I was rudely shocked out of a good sleep at 2AM by my phone and its stupid loud weather alert. It took 2.5 episodes of Roseanne to fall back asleep, mainly because my heart had to start beating again after the surprise of the alarm.

I went outside this morning to check on the flowers–everything is completely soaked out there–and I found this teeny, tiny flower on my Cypress Vine. Isn’t it the sweetest little thing? There are supposed to be pink, white and red flowers eventually. I cannot wait!

portulaca, kimberly AH balconyThe huge rain made my portulaca explode. I’ve decided that next year (yes, I’m already planning my flowers for next year) I will be planting more portulaca in all the colors of the rainbow.

As far as failure goes…well, have you looked at the calendar lately? Summer is almost over. I’m failing my Summer Manifesto. I still haven’t tried three new cocktails with herbs from our gardens or three new tomato recipes. I haven’t taken more walks or really rediscovered Chicago. And, while we have had a few special guests for Hasegawa Happy Hours, we haven’t had enough of them. I know the US thinks of Labor Day as the end of summer, but as long as we have tomatoes and a garden, it’s still summer to me. Before I start planning fall cocktails and soups and balcony parties, I’m determined to at least mix up a few herbal gin drinks and soak up these long days while I can.

Tagged , , ,

A Place For Everything & Everything In Its Place

Home Decorator's Collection, Martha Stewart flat fileIt’s been a little quiet over here on the blog these past couple of weeks. I’ve been trying to focus on cleaning up around here, spending time outside and drinking in this wonderful summer.

One of the most exciting things about cleaning up around here is that we added another, final piece to our desk set-up in the living room. (You can see the beginnings of the office area here and here.) The two desks kind of looked lonely so we added a third piece from the Martha Stewart Craft Collection at Home Decorators. It’s a flat file and I am thrilled to be able to have more space for some of my mail art and craft supplies.

The most exciting part is that two of the drawers are large enough to hold my huge collection of handmade papers. Some of them have been rolled up for years in my trunk and in a drawer and in a spare trash can in the guest room, so it’s amazing to have them all in one place, lying flat and ready to use. Home Decorator's Collection, Martha Stewart flat fileThe other exciting part is that the other giant drawers have these little dividers, creating ready-made cubbies for all my stationery things. I’m currently picking patterned papers to line each section. Lining drawers is serious business around here.

We are still waiting for the parts to finish the last drawer in the cabinet. There were a couple of pieces that cracked during shipping, but thankfully we were able to get the whole thing together minus one drawer and that last drawer will be a piece of cake to finish once we get those parts. (Edit: we=Naoto…he did 99% of the work building this.) The furniture is all in place and I’m filling it up quickly. I hope to be able to show you another in-progress shot next week. There is still quite a lot of work to do–I will have to move the artwork and patch some holes in the wall and repaint the wall–before I can call the living room “complete.”

I will be back next week with an update, hopefully, and some more regularly scheduled programming. Have a great weekend!

Tagged , , , , , ,

Plot #6: The Season’s First Tomatoes

plot 6, juliet tomatoesWe discovered three really ripe Juliet tomatoes in the garden yesterday!! They probably could have been picked a little sooner, but I didn’t get over there much last week.

Now’s the time though…now’s the time for going to the garden every day or so to check for little red gems on the vines.

plot 6, juliet tomatoesOur four Juliet plants are all dripping with green tomatoes. It’s going to be another bumper crop this year. What you see above is just one branch of one part of a plant! It seems so weird that three random tomatoes were red and all the others look so very green…but that’s the way it was last year, too. All of the Brandywines and yellow pear tomatoes are still green, too. We are going to have to wait a little longer for those. plot 6, yellowed leaves plot 6, juliet tomato plantJust like last year, we have some blight happening. We’ve tried to cut off most of the yellowed leaves, but I need to go again this week and do a deeper cleaning of everything. Have you had this problem with  your tomatoes? Peggy suggested adding eggshells to our soil when we plant our tomatoes next year. Thankfully, the fruits are undamaged so far and most of the plants are still looking healthy otherwise. plot 6, flower gardenRemember how I randomly planted a few flowers from the seed bank in our community garden shed? Well, the flowers–cosmos and bachelor buttons–have grown as tall as the tomatoes and have taken over their little corner of the garden. I’ve been cutting a few for our kitchen counter and leaving some of the floppy ones for the butterflies. balcony flowersAnd speaking of flowers, my first Morning Glory appeared yesterday morning! I planted five types of climbers in June and they are all finally starting to vine. The Morning Glories and Moonflowers are the furthest along and the Cardinal Climbers and Cypress Vines are close behind. I’m nursing the single Black-Eyed Susan vine along. It’s struggling. balcony flowersAnd, I’m finally getting more blooms on my Trader Joe’s hibiscus. It’s so cheerful, isn’t it? balcony flowers, hibiscus

Tagged , , , , ,

Our Blooming Balcony

kimberly ah balconyOur balcony is open for relaxing! And honestly, that’s all I’ve been doing lately because the weather has been gorgeous! I bought some throw pillows at Target for the couch and the chairs. They make it cozier than ever to read a book or take a nap outside.

I finally finished all of my planting and re-potting. Once the seeds grow, hopefully there will be more flowers and vines. kimberly ah balconyI have a tiny herb garden growing behind the couch. We have two kinds of mint, basil, thyme and lavender growing along with the only two annuals that made it through the polar vortex last winter. And, in a rebellious move that is probably breaking some sort of condo ordinance, I have several pots of seedlings situated outside of the railing for maximum sun and rain exposure. I’ve planted parsley, zinnias, lettuce and four types of vining flowers. (I may be in over my head with the amount of vining flowers I’ve planted…if the building falls down under the weight of morning glories, I take full responsibility.) kimberly ah balconyWhile I’ve planted a lot of seeds this year, I took a big shortcut with my hanging pots. I usually put together my own pots, but this year I put together two and bought four: the portulaca above, two ivy geraniums, and another fuchsia. I repotted my old geraniums with some new in one pot…I’m hoping it fills out a bit. Last year, I stuck with geraniums because I knew I could make them work. This year, I’m branching out so the pressure is on to keep everything alive! kimberly ah balconyThe fuchsia is bright pink with purple centers…I know I said I hate purple, but I really love this plant! kimberly ah balconyThis is my original fuchsia. I filled out the pot with a vinca vine that is really taking off. Fuchsias are sun/shade plants so I’m really hoping the north side of the balcony is just right for them. So far they seem to be doing well, growing tons of buds and blooms. kimberly ah balconyI wasn’t going to plant petunias this year because I tend to kill them by August, but I fell in love with these two varieties and decided to plop them together in one pot. The deep purple ones are Queen Bees and they are supposed to have yellow centers, though I haven’t seen any yellow yet. And the tiny peach ones are Mochaccinos. I love the tiny peach flowers. kimberly ah balconyI also bought a little wicker cube to contain all of my gardening supplies. It’s nice to have them out of sight and the top of the cube can act as a little side table during dinners outside. kimberly ah balconyOn the black table in between the “living” and “dining” areas, I have a hibiscus and my clover (the clover lives in the kitchen during the winter). Some of my seedlings will move over here eventually.

So that’s the balcony. It’s not perfect but it really does feel like an extension of the living room these days. I’m just hoping I can squeeze in every moment possible outside before the heat and humidity takes over!

Tagged , , , , , , ,